
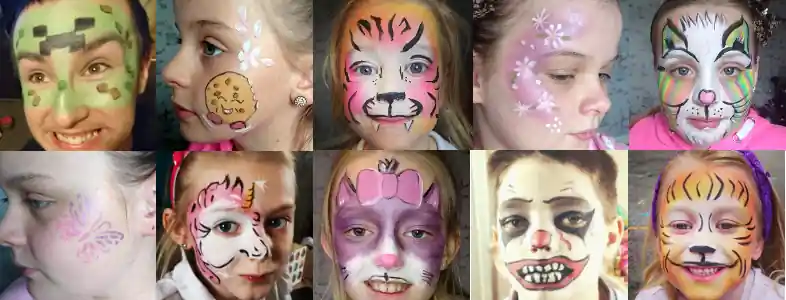
Facepainting using stencils can save time and help produce great results, even if you don’t feel confident to freehand the design.
Designs
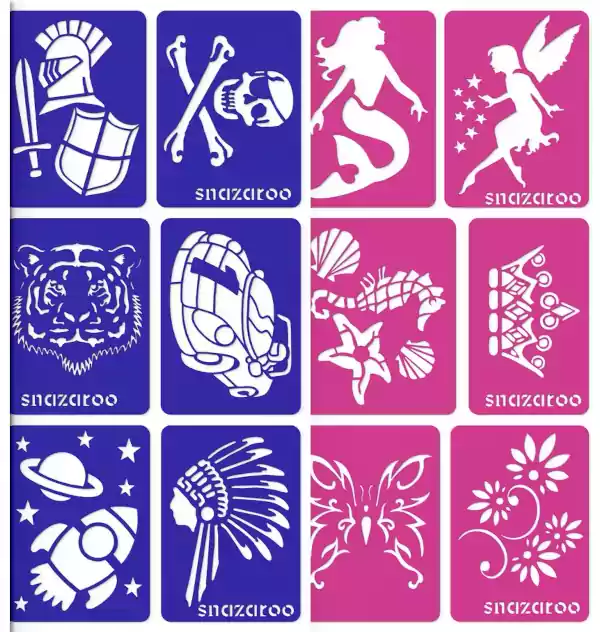
Facepainting stencils come in a wide range of different designs for various styles. You are somewhat limited to using the stencils you have to hand. It is possible to reuse a stencil and make it different each time. Using the stencil as a base, then using different colours or making different additions to the design can produce various results. Of course, you can produce identical copies for friends who want to match designs. The stencils make the repeatability very high.
Time-Saving
Stencils can save a lot of time. A quick stencil face paint can be all needed for a child who doesn’t want to settle. You get a striking design in a single colour in very little time.
You can also use a stencil to save time on complicated face painting by using the stencil to give a quick base image. Further embellishments can be applied to the stencil base image to make it stand out.
Save more time by using two stencils.
Wipe Clean
Some stencils are wiped clean and reusable, while others are disposable. Pick the ones that you think will best serve you. If you are not sure about the need to spend the extra cost, start with disposable. Upgrading to reusable stencils for your most popular designs will allow you to manage the expenses.
A mild antibacterial agent suitable for plastics and skin can be used to wipe down the stencils between children. This quick and simple procedure will become second nature and can help prevent the spread of germs between the different children.
How To
While different face paints have instructions you should follow, there are some basics.
- Tape, hold in place or use the self-adhesive type of stencil.
- Moisten a sponge and squeeze out most of the water.
- Wipe the moist makeup sponge across the facepaint.
- Wipe or dab the sponge over the child’s exposed skin under the stencil.
- You don’t need to be accurate because the stencil does the work for you.
Remove the stencil carefully to reveal the design. You can then further embellish the face painting or admire your finished job.
Customisation
Using the same stencil more than once doesn’t mean all those facepaint have to look identical. You may have children who want the same design as their friends, but you can customise the stencil design for a unique facepaint.
Using different colours is a simple way to get multiple, different designs out of a single stencil, but there are many more ways to customise a facepaint stencil result:
Layering Stencils
You can use multiple stencils together to create complex designs. Start with a base stencil and then layer additional stencils on top to add details or texture. This allows for intricate and multi-dimensional designs.
Blending and Gradients
Rather than using a single solid colour, you can create gradients or blends of colours within the stencil design. Start with one colour at the centre and gradually blend it into another colour toward the edges of the stencil.
Glitter and Shimmer: Apply glitter or shimmer powder over the stencilled design to add sparkle and dimension. After applying the face paint through the stencil, lightly dust the area with cosmetic-grade glitter or shimmer powder while the paint is still wet.
Texture Effects
You can add texture to the stencilled design by lightly dabbing a sponge or stippling brush over the painted area while the stencil is still in place. This can create interesting effects like scales, fur, or rough textures.
Masking
Use stencils as masks to create negative space designs. Apply a base colour to the entire face, place the stencil over it, and then remove sections of the stencil to reveal the underlying colour. This can create the illusion of patterns or cutouts.
Stencil Tracing
After stencilling a basic shape, you can use a fine brush to outline and refine the design. This allows you to add more intricate details and definitions to the stencilled shape.
Incorporate Freehand Painting
Don’t limit yourself to just stencils. Combining stencilled elements with freehand painting creates a more personalised and unique design. This way, you can add custom features and highlights to your face paint. Using a stencil, you can gain freehand confidence and build on the result with freehand embellishments.
Add Accessories
Use accessories like rhinestones, sequins, or small decals to enhance the stencilled design. Apply these embellishments strategically to complement the overall look. These don’t need to be expensive; see the Amazon listing for rhinestones for face painting. Please consider the suitability of accessories for younger children as they may not be suitable for very young ones.
Layer with Face Paint
Apply stencils first and then paint on top of them. This allows you to create complex designs that combine stencilled patterns with hand-painted details. This can be used as another confidence booster. A light application of the face paint with a stencil can give a design to follow. Part freehand, part guided to help you but make the face painting more personalised.
Experiment and Practice
The more you experiment with different techniques and combinations, the more creative and unique your designs will become. Practice is key to mastering the art of customising face paint stencils. With each face-painting job you go to, each child party or event, you will build your experience and improve your technique.
Remember
Always use safe, non-toxic, and hypoallergenic face paints and products. Additionally, consider the preferences and comfort of the person you are face painting, as some individuals may have sensitivities to certain products or techniques.
Leave a Reply